 Vidlark
How to use it
A step-by-step guide, with a picture of every screen. Install Vidlark once, then every video is one press of the red button. Vidlark and every tool it needs are free.
On a Mac
What you need #
- A Mac with Apple silicon on macOS 15 or later. To check, open the Apple menu, then About This Mac. Chip should say Apple M1 or newer, and macOS should be 15 (Sequoia) or later.
- The Xcode app, free from the App Store. It is big, so start its download first.
- Your Apple ID, the one you use for the App Store. It gets you the free certificate that lets Vidlark record the screen.
- Free space for your videos. A 15 minute take needs about 3 GB.
- For a phone camera or a phone mic: the phone and the Mac on the same Wi-Fi. An iPhone needs iOS 16.4 or newer. An Android phone needs Chrome.
Install #
Vidlark is built on your own Mac from its code on GitHub. There are two ways to do it, and both end with the same app. Claude Code can do almost all of it for you. Or you can follow the steps by hand, which cost nothing.
Tell your AI to set it up #
Claude Code is Anthropic's coding assistant. It runs in the Claude desktop app or in the Terminal app, and it needs a paid Claude plan.
Install Xcode from the App Store, and open it once. Claude cannot install apps from the App Store, so this one is yours. When Xcode has finished setting up, you can close it.
Open Claude Code and paste this in. Press the Copy button, then paste.
Set up Vidlark on my Mac for me. Vidlark is a free screen and camera recorder, and its code is at https://github.com/neel542/vidlark

1. Check that this Mac has Apple silicon and macOS 15 or later. If it does not, stop and tell me.
2. Install what it needs: Xcode's command line tools, Homebrew, then ffmpeg and whisper-cpp with Homebrew. Skip anything already installed.
3. Clone the repo into my home folder and build it with: bash Tools/build.sh
4. Screen recording needs a free Apple Development certificate. If the build did not sign with one, tell me exactly how to add mine in Xcode, wait for me, then build again.
5. Download the speech model for transcripts into ~/.cache/whisper, as the README says.
6. Open dist/Vidlark.app

Before you install anything, tell me what it is and wait for my yes. If a step needs my password, give me the exact command to run in Terminal myself. When it is done, tell me what is left for me to do.
Answer its questions. It tells you what each tool is and waits for your yes before installing it.
If a step needs your Mac password, Claude gives you a command to run in Terminal yourself. When you type the password there, nothing shows on screen, not even dots. That is normal. Type it and press Return.
Add the free certificate when Claude asks. This is the one step only you can do, because it signs in with your Apple ID. Follow the certificate steps below, then tell Claude you are done. It builds the app again.
Vidlark opens. Go on to The first time.
By hand #
Every command below goes into the Terminal app. Press its Copy button, paste it into Terminal with Command V, press Return, and wait until Terminal is ready for the next one.
Install Xcode. Open the App Store, search for Xcode, and press Get. It is free, and big, so it takes a while.
Open Xcode once and wait until it finishes setting up. If it asks which platforms you want, macOS is enough. Then close it.
Open Terminal. Press Command Space, type Terminal, and press Return.
Install Xcode's command line tools. If a window asks, press Install. If Terminal says they are already installed, that is fine: go on.
xcode-select --installInstall Homebrew, the free tool that installs the other tools. It asks for your Mac password. Nothing shows as you type it: that is normal. Type it and press Return.
/bin/bash -c "$(curl -fsSL https://raw.githubusercontent.com/Homebrew/install/HEAD/install.sh)"When it finishes, run this once, so Terminal can find Homebrew:
echo 'eval "$(/opt/homebrew/bin/brew shellenv)"' >> ~/.zprofile
eval "$(/opt/homebrew/bin/brew shellenv)"
Install the two tools that finish each take. ffmpeg makes the finished video, and whisper-cpp writes the transcript.
brew install ffmpeg whisper-cppGet the free Apple Development certificate. This is the step people find confusing, so take it slowly. macOS only lets an app record the screen when the app is signed with a certificate. Apple gives one away free with any Apple ID. You do not need to pay for the Apple Developer Program.
Open Xcode. In the menu bar at the top of the screen, click Xcode, then Settings. Or press Command , (the comma key).
Click Accounts, at the top of the Settings window.
Add your Apple ID. Click the + button at the bottom left, choose Apple ID, click Continue, and sign in.
- Xcode
- Settings
- Accounts
- +
- Apple ID
Pick your account. Your Apple ID now shows in the list on the left. Click it. On the right is a team with your name and Personal Team.
Make the certificate. Click Manage Certificates. In the small window, click the + at the bottom left, then Apple Development.
- Manage Certificates
- +
- Apple Development
Check it is there. A certificate with your name appears in the list. Click Done and close Xcode. You only ever do this once.
Download Vidlark's code into a folder called vidlark, in your home folder.
git clone https://github.com/neel542/vidlark.git
cd vidlark
Build the app. The first build takes a few minutes. If a box asks to let codesign use your keychain, type your Mac password and click Always Allow.
bash Tools/build.shLook at the last lines.
Signed with: Apple Developmentmeans it worked. If it sayswarning: no Apple Development certificate found, go back to the certificate step, then build again.Open Vidlark.
open dist/Vidlark.appNext time, open it from Finder: your home folder, then vidlark, then dist, then Vidlark. To keep it handy, right-click its icon in the Dock, then Options, then Keep in Dock.
For transcripts, download the speech model. It is about 550 MB. Without it, everything still records, and only the transcript and the list of retakes are skipped.
mkdir -p ~/.cache/whisper
curl -L -o ~/.cache/whisper/ggml-large-v3-turbo-q5_0.bin https://huggingface.co/ggerganov/whisper.cpp/resolve/main/ggml-large-v3-turbo-q5_0.bin
The first time #
macOS asks you to allow the camera, the microphone and the screen. You only do this once.
Allow the camera and the microphone. When Vidlark opens, macOS asks twice. Click Allow each time. On some Macs the button says OK.
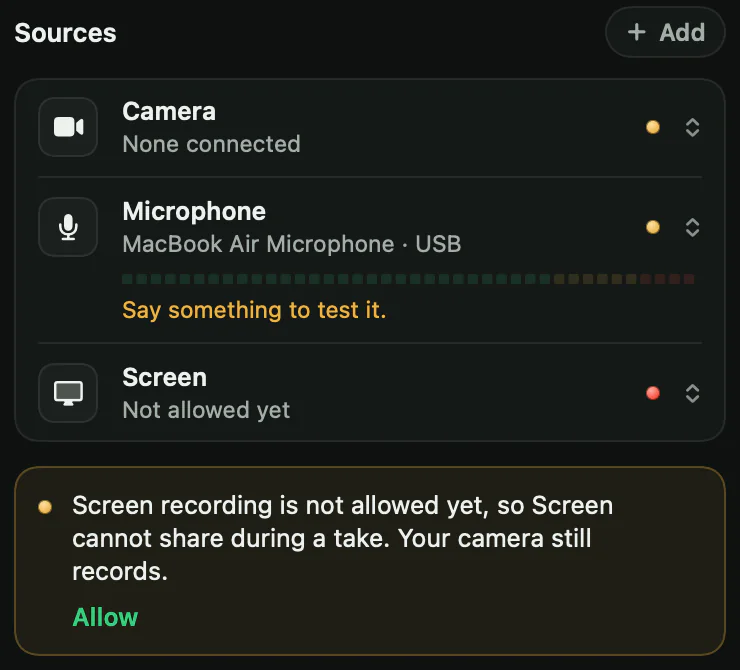
Allow screen recording. Under the Sources list, a note says the screen is not allowed yet. Click Allow in that note.
Switch on Vidlark in System Settings. System Settings opens on the right page. If macOS asks first, click Open System Settings. Then switch on Vidlark in the list.
- System Settings
- Privacy & Security
- Screen & System Audio Recording
- Vidlark
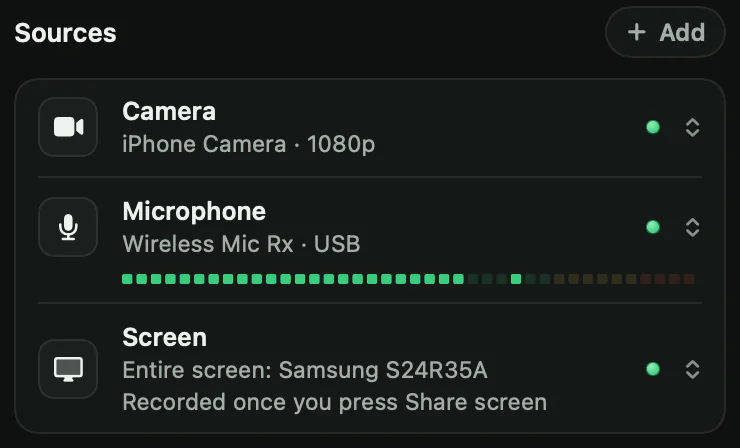
Quit Vidlark and open it again. macOS offers a Quit & Reopen button: click it. Every lamp in the Sources list turns green, and the panel says "Ready. Press the red button to record."
Your first video #
Every take starts on your face. You add the screen when you want it, and Vidlark makes the finished video when you stop.
Give the video a name, if you like. Click the title at the top left. Until you add a script, it says No script. Choose Add script file or Paste script, or drop a script file onto the window.
A line that starts with
#at the top of the script becomes the title, and the take's folder gets that name too. No script? That is fine: the take is saved as Quick recording with the time. See The prompter for how a script looks.
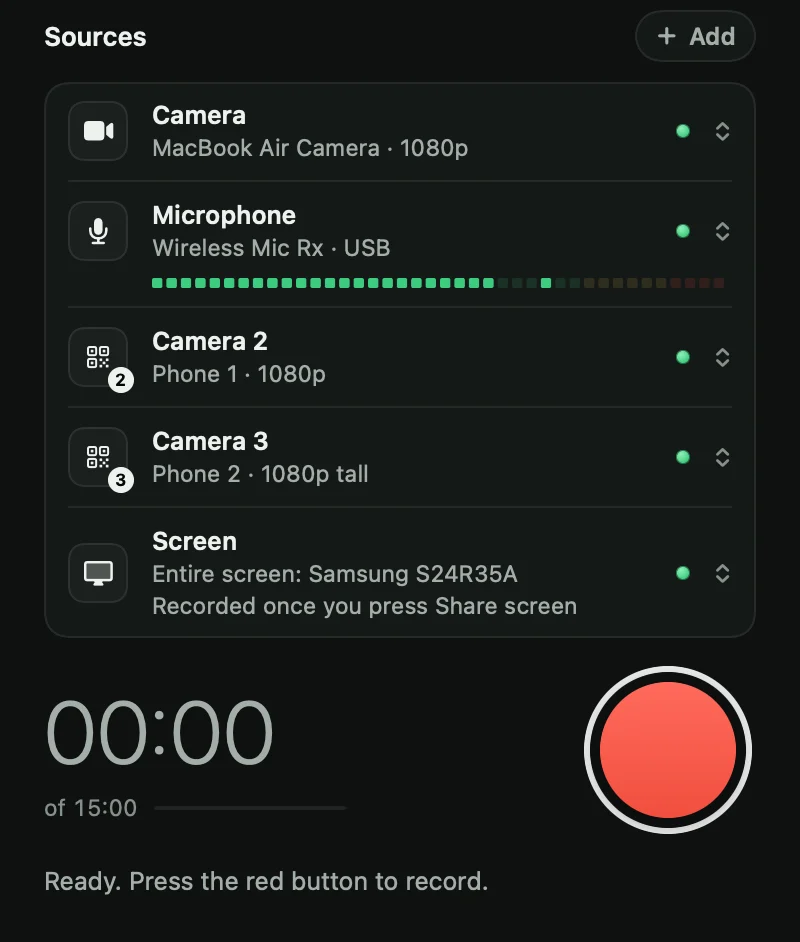
Check the Sources list. It shows your camera, microphone and screen, each with a lamp. Green means ready.
Say a few words: the meter under Microphone moves. To use another camera, mic or screen, click its row and pick one.
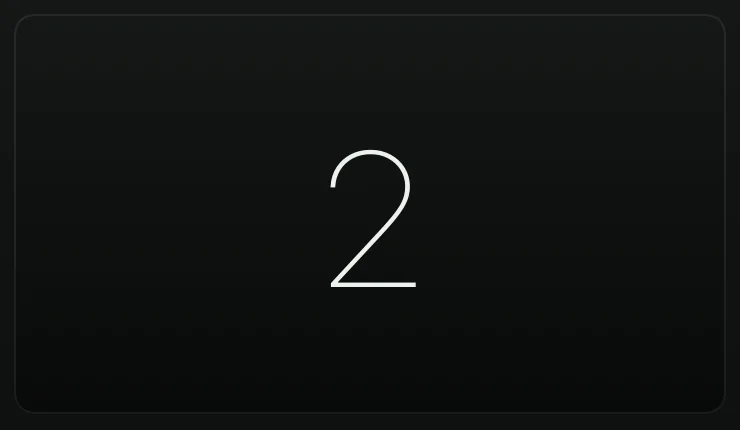
Press the big red button. Vidlark counts down 3, 2, 1 with three short beeps. A higher beep means recording has started: start talking then. The count itself is not recorded.
Changed your mind? Press the button again during the count to cancel.
You are recording, on your face. The picture shows REC and the time counts up. The window stays where it is, and a Share screen button appears.
For a video of just you, keep talking and skip to Stop.
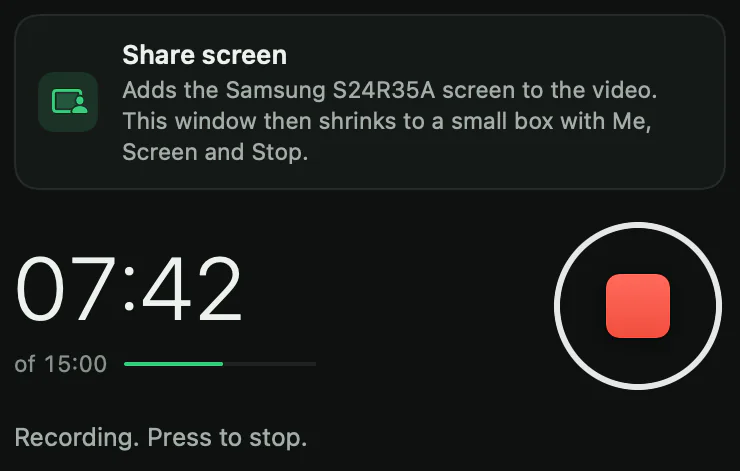
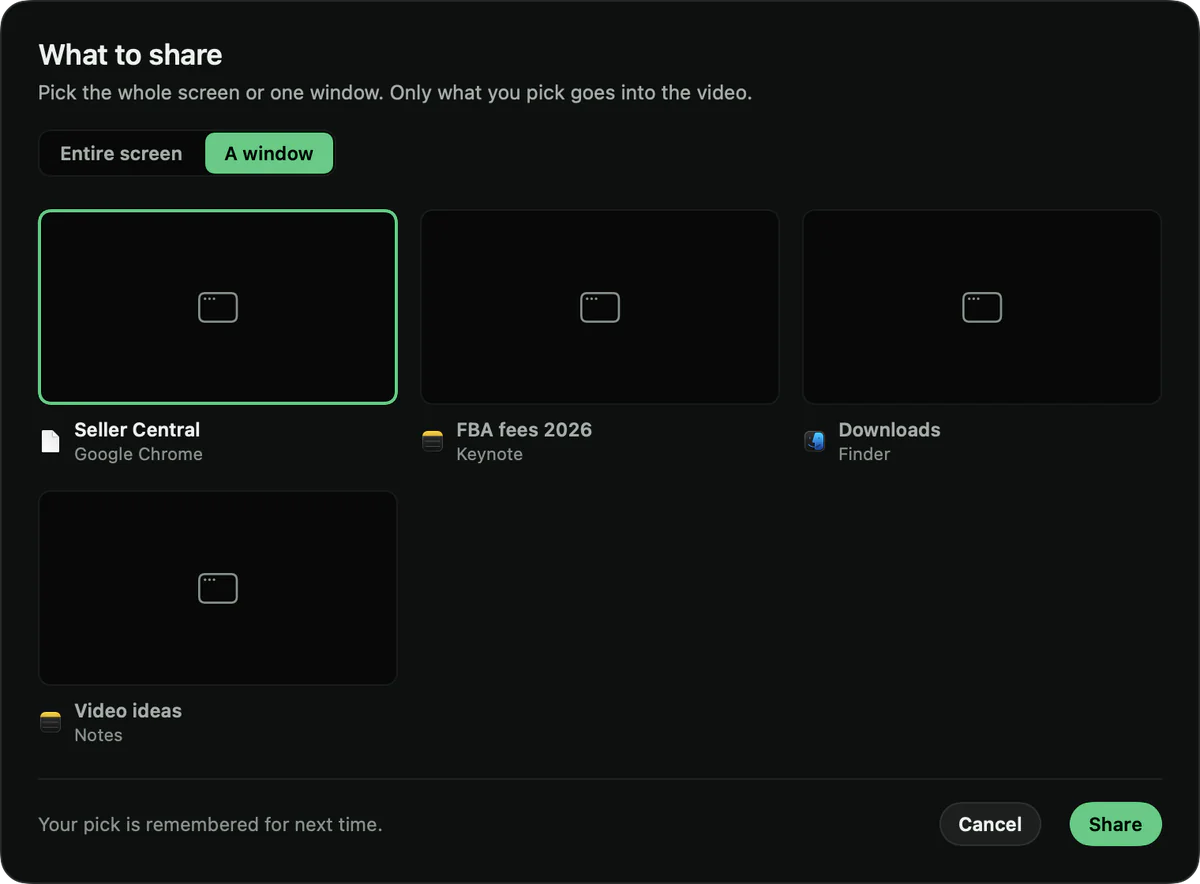
Press Share screen when you want the screen in the video. A window called What to share opens. Pick Entire screen, or A window to show only one window, like your browser. Then press Share.
Your pick is remembered, so next time it is one click on Share. Only what you pick goes into the video.
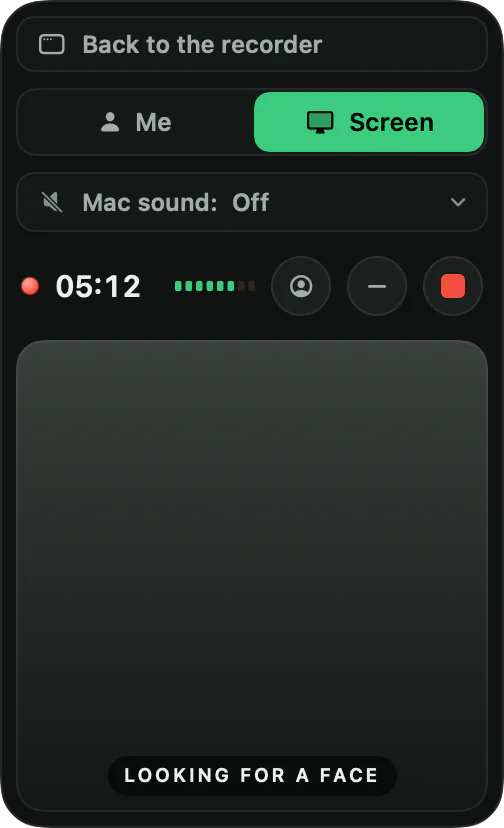
The window shrinks to a small recording box at the top right of your screen. The box is only on your screen, never in the video. From top to bottom:
- Back to the recorder brings the Vidlark window back. The take carries on.
- Me and Screen pick what the video shows.
- Mac sound adds what the Mac plays, from every app or only one, like a video in your browser.
- The red dot and the time show the take is recording, and the meter shows your voice.
- The face button puts your face in the video, or takes it out.
- The minus button hides the picture of your face in the box. Click the picture to switch between your face and the whole camera view.
- The red square stops the take.
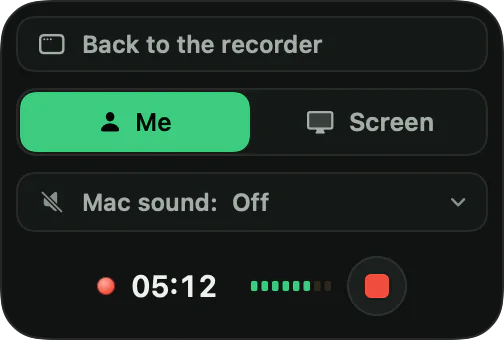
Click Me or Screen to switch what the video shows. Me fills the video with your camera. Screen shows your screen again.
The finished video follows your clicks, so there is nothing to cut afterwards. Both the camera and the screen keep recording the whole time, as their own files.
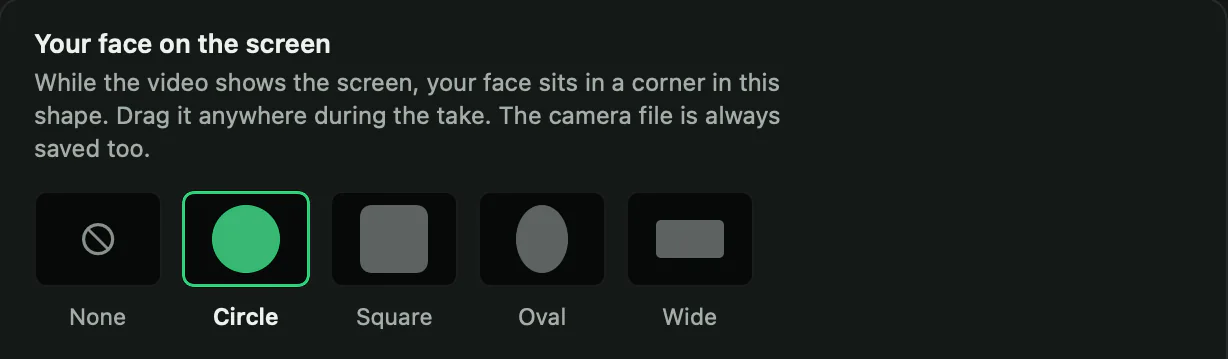
Want your face on the screen too? Open Settings (the gear, or Command ,), then In the video. Under Your face on the screen, pick Circle, Square, Oval or Wide. None keeps your face out.
During a take, the face button in the box puts your face in or takes it out, and you can drag it anywhere on the screen. Your camera is always saved as its own file too, so the shape can still change when you edit.
Press stop. Use the red square in the box, or the big button in the Vidlark window. Everything stops together.
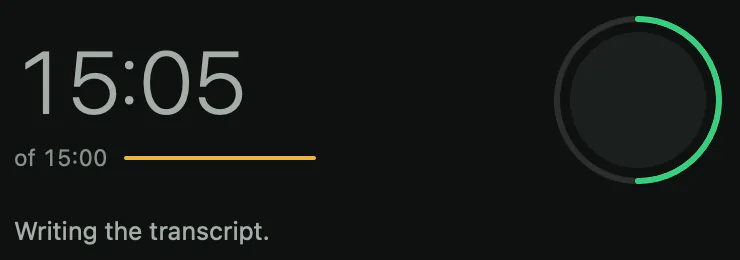
Wait while Vidlark finishes the take. The window comes back and says each step as it works, like "Writing the transcript." It lines up the files by their sound, makes the finished video and writes the transcript. After a long take this takes a minute or two.
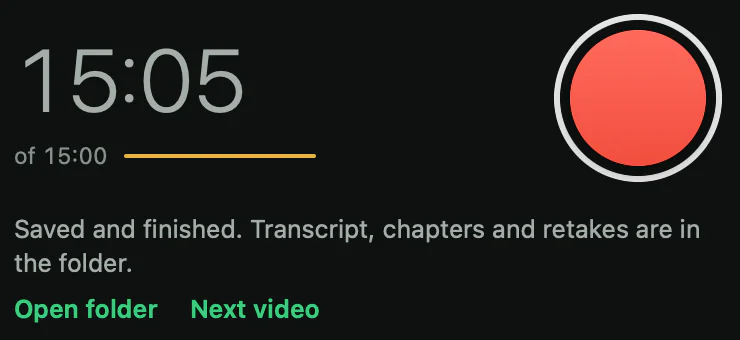
Done. The panel says "Saved and finished." Click Open folder to see the files. The one to upload is
video.mp4.To record again, press the red button. Each take gets its own folder, so nothing is ever replaced.
Made a mistake? Say "retake" and repeat the line. The take keeps going, and retakes.json lists where every retake is, so you can find them when you edit.
Where your files go #
Every take gets its own folder, in a folder all the Mac's users share. Open folder, after a take, takes you straight there. In Finder it is:
- Macintosh HD
- Users
- Shared
- Vidlark Recordings
- the date and title
- recording-1
| File | What it is |
|---|---|
video.mp4 | The finished video, ready to upload. Made when you shared your screen. |
camera.mov | Your camera, with your voice. |
screen.mov | Your screen, with your voice and the Mac's sound if it was on. |
camera-2.mov | Each extra camera or phone. |
mic-2.m4a | Each extra microphone. |
mic.wav | The clean voice track. |
words.json | The transcript, with the time of every word. |
chapters.txt | YouTube chapters to paste into a description. |
retakes.json | Every "retake", with its time. |
report.md | A plain summary of the take. |
Add a phone camera #
Any iPhone or Android phone can film another angle, over your Wi-Fi. There is no app to install and no cable.
Press + Add, above the Sources list, then Add a phone with a QR code. A window shows a QR code.
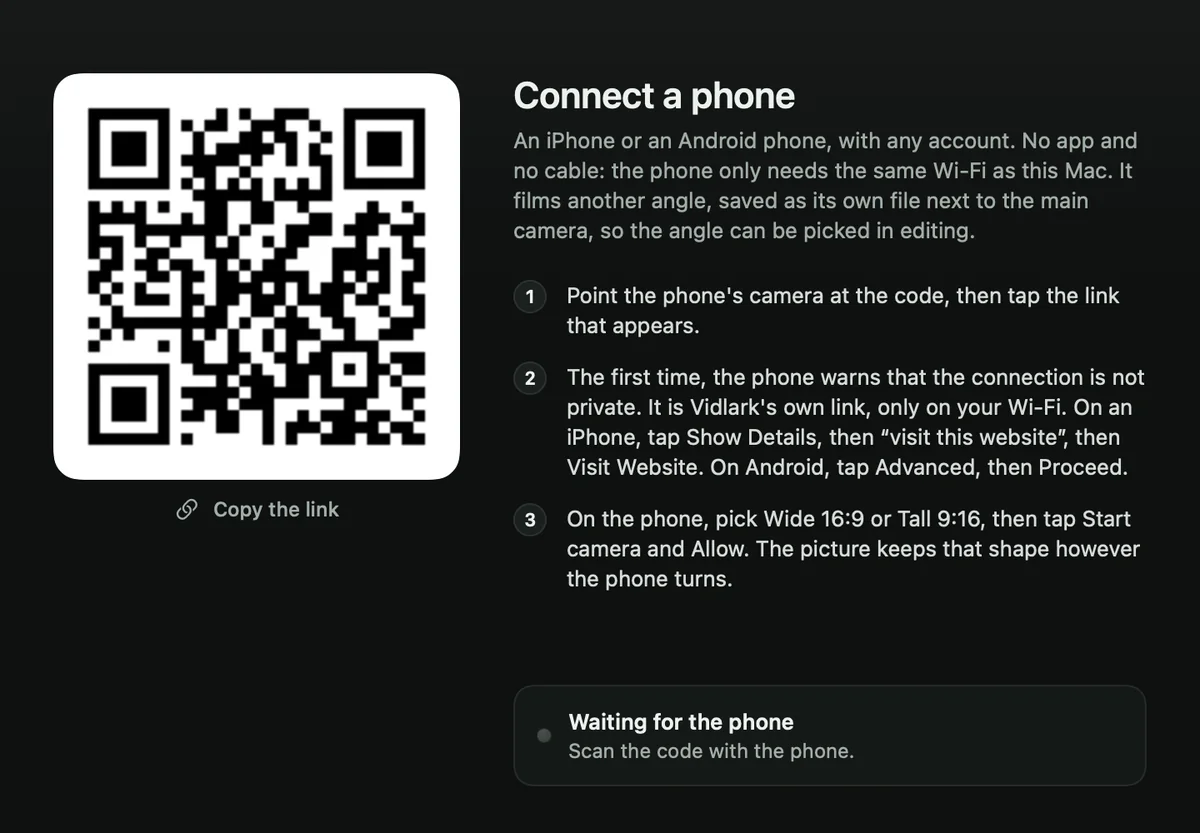
Point the phone's camera at the code, and tap the link that appears. The phone needs to be on the same Wi-Fi as the Mac.
Get past the one-time warning. The first time, the phone says the connection is not private. The link is Vidlark's own, and it only works on your Wi-Fi.
On an iPhone, tap Show Details, then "visit this website", then Visit Website. On Android, tap Advanced, then Proceed.
Pick the shape, then tap Start camera. Wide 16:9 is for YouTube. Tall 9:16 is for Shorts and Reels. Then tap Allow, so the page can use the camera.
The picture keeps that shape however the phone turns. Put the phone in a stand, keep the page open, and plug it in for a long take.
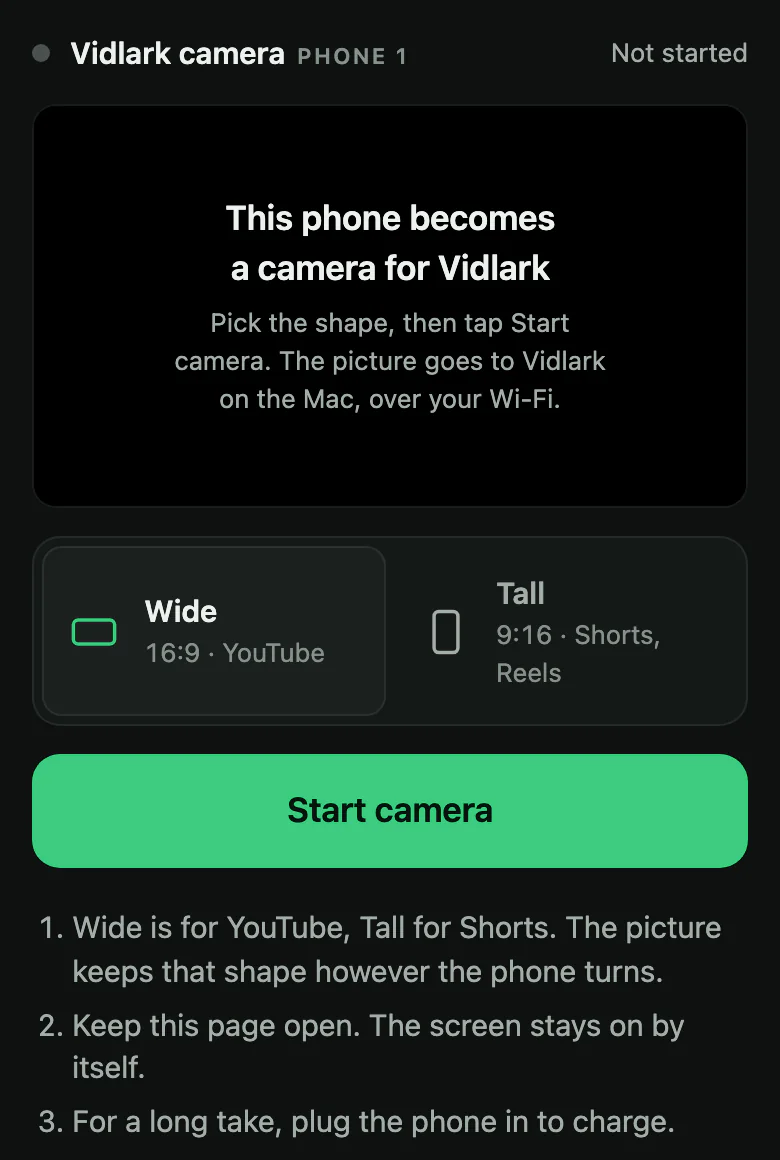
The Mac says Connected. Press Done.
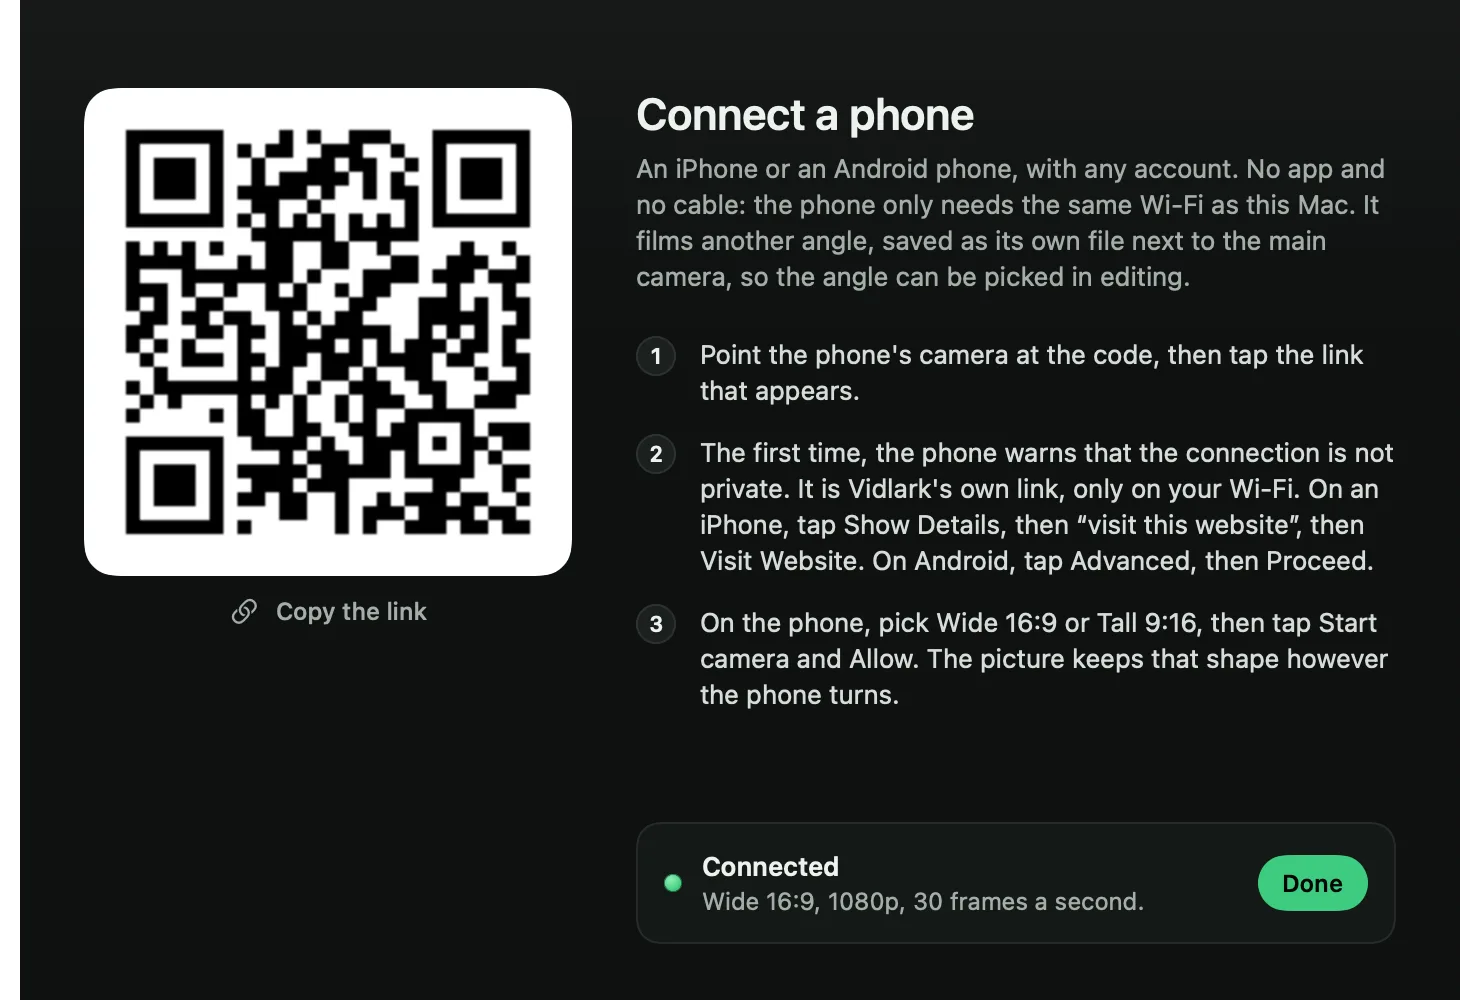
The phone is now a source, called Camera 2. It records its own file,
camera-2.mov, lined up with the main camera by sound, so you pick the angle when you edit.Add up to four phones the same way. To film with a phone as the main camera instead, click the Camera row and pick the phone there.
Microphones #
A better mic makes the biggest difference to a video. Vidlark can record several at once, each to its own file.
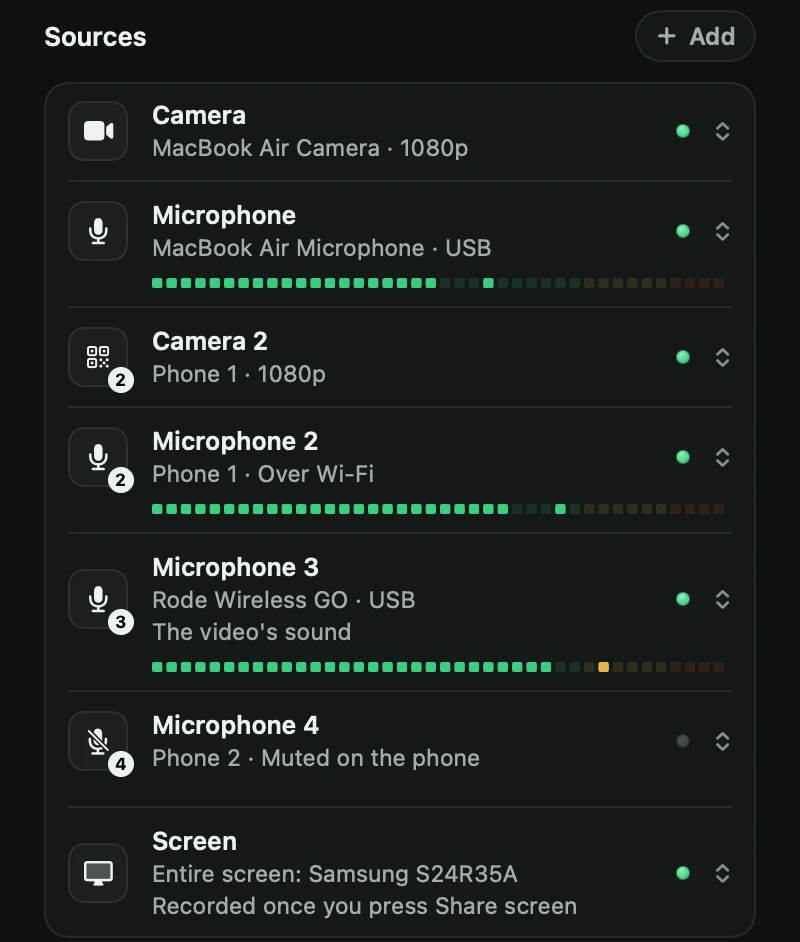
Plug in or connect the mic, then press + Add and pick it under Another microphone. It gets its own row, its own meter and its own file,
mic-2.m4aand on.The main mic is the Microphone row. Click it to pick a different one.
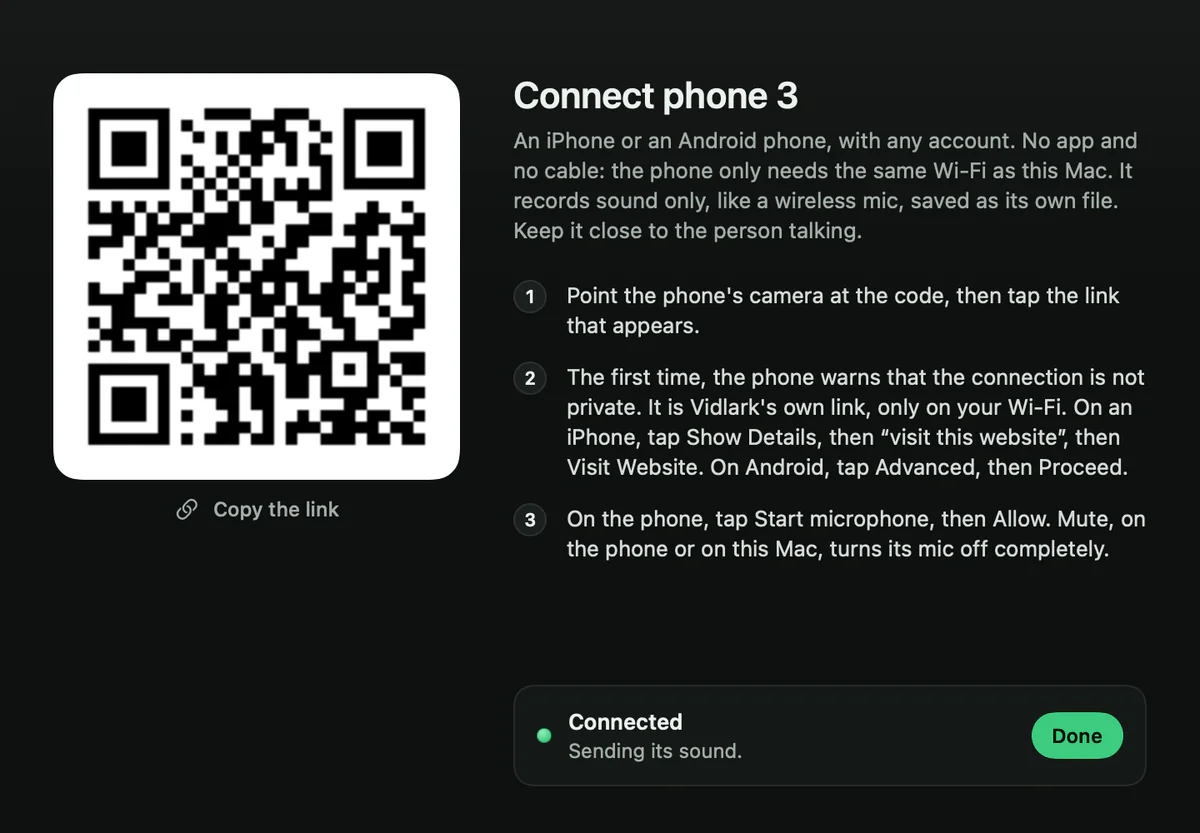
Use a phone as a wireless mic. Press + Add, then A phone as a microphone, with a QR code. Scan the code with the phone, tap Start microphone, then Allow. Keep the phone about a hand's width from your mouth.
A phone that already films an angle can record its sound too: open its row's menu and pick Record this phone's sound too.
Pick the mic for the finished video. Open that mic's row menu, with the arrows at its right, and pick Use for the video's sound. The row then says "The video's sound". Every mic records either way.
Mute a phone's mic by tapping Mute on the phone, or by picking Mute the phone's mic in its row on the Mac. Either side can turn it back on.
AirPods and other Bluetooth mics record at phone call quality. A USB mic or a wireless mic kit sounds better.
The prompter #
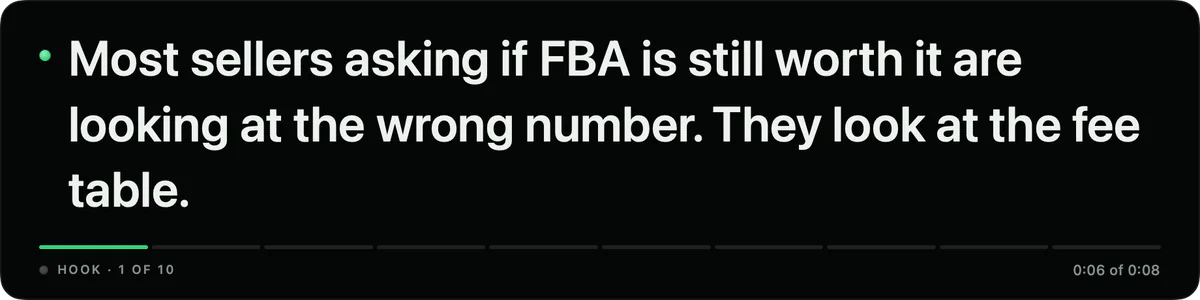
The prompter shows your script one line at a time, in a strip at the top of the screen that is never recorded.
Write a script as a plain text file. The first line is the title. Written-out paragraphs show word for word. Each bullet shows on its own, for you to talk around.
# My first video
Target: 15 min

## Hook
Written out word for word. It shows a little at a time.

## The main part
- One bullet per line
- You talk around each one
Add it to Vidlark. Click the title at the top left, then Add script file or Paste script, or drop the file onto the window. Add several scripts to make a list for the day: the panel then says Video 1 of 3.
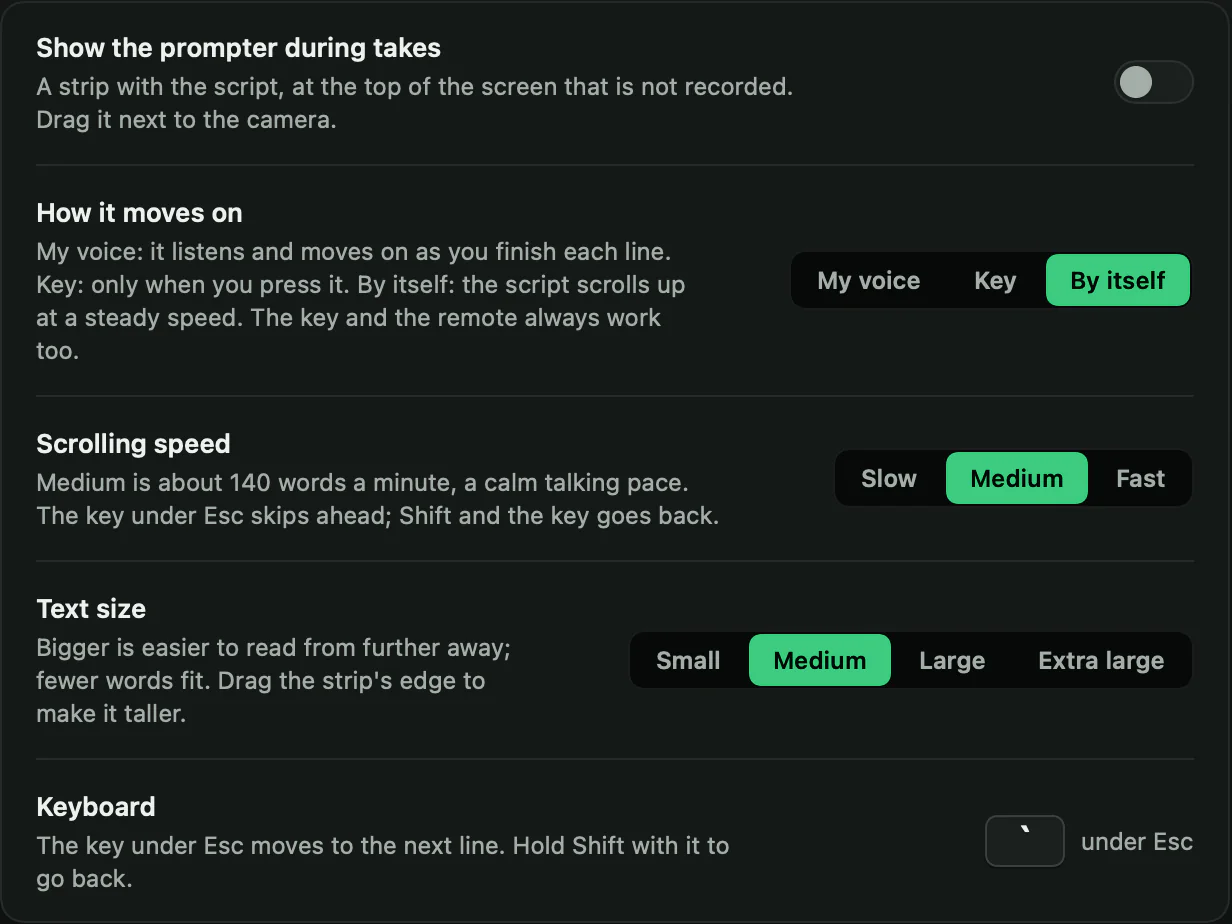
Switch the prompter on. Open Settings, then Prompter and remote, and switch on Show the prompter during takes. It starts switched off.
Then pick how it moves on. My voice listens and moves on as you finish each line. Key moves on only when you press the key under Esc (hold Shift with it to go back). By itself scrolls at a steady speed. A Bluetooth remote can move it too: set its buttons under Remote buttons.
Read from the strip during the take. Drag it next to the camera, so your eyes stay close to the lens. Drag its edge to make it taller. The line under the words shows how far through the script you are.
Watch live from another device #
Someone helping you can watch the shoot on a laptop or phone, in a web browser, with no login.
Open Settings, then Live view, and pick Home Wi-Fi.

Press Copy link and open it in a browser on another laptop or phone on the same Wi-Fi. It shows every camera, the screen while you record, the mic level and the checks.
Listen plays the mic as it records: use headphones. Pin makes one picture big, and Full screen fills the screen with it.
Away from home, pick Anywhere. It works from any internet connection, through a free secure link that changes each time it starts. It needs one more free tool:
brew install cloudflared
Keep the link private. Anyone with it sees your screen, including anything private on it. New link stops every old link working.
The Recordings page #
Open it with the Recordings button at the top right of the panel, or press Command Shift R. Every take shows with a picture, its length and its size.
Search by name, or filter by All, This week, Not finished, With screen or Camera only.
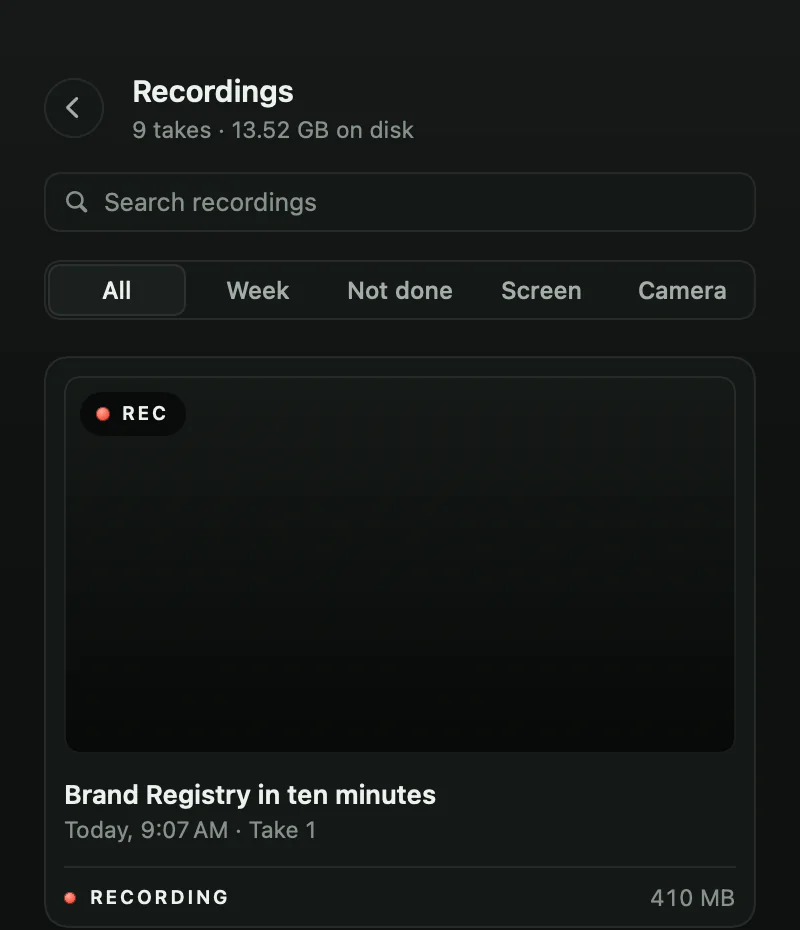
Click a take to watch it. Video plays the finished video, and Camera and Screen play those files, at the same moment. The mic choices at the bottom right play any mic under any picture. Open in QuickTime Player and Show in Finder are at the bottom left.
Settings worth knowing #
Open Settings with the gear, or Command ,. Every option says in one sentence what it does.
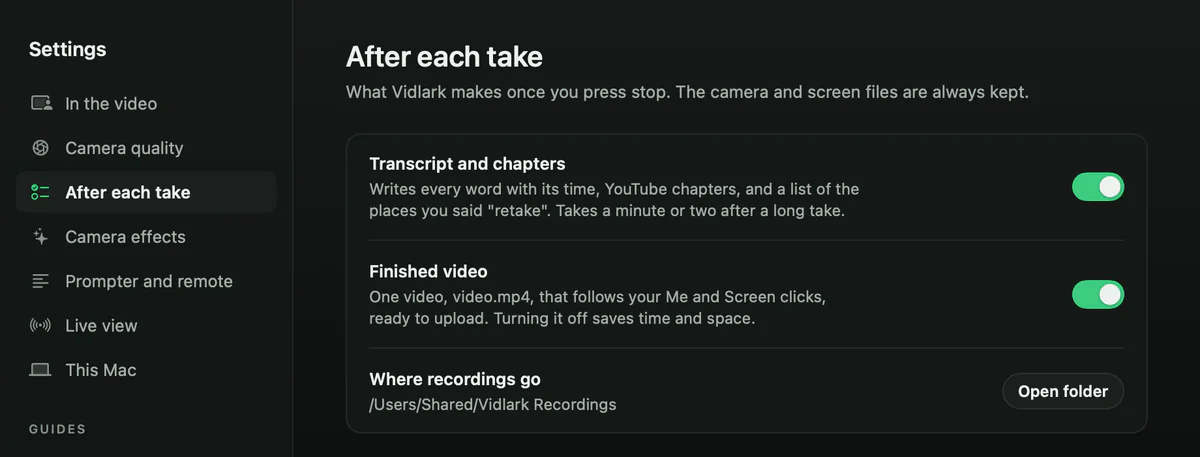
| Page | Worth knowing |
|---|---|
| In the video | Your face's shape on the screen. Keep my face framed in the video follows your face when the camera fills the video. Include the Mac's sound. |
| Camera quality | Sharpness: Best it offers, 4K, 1080p or 720p. Smooth motion records 60 frames a second, with files about twice as big. |
| After each take | Turn off Transcript and chapters for a quick video. Open folder shows where recordings go. |
| Camera effects | Studio Light, Portrait and Center Stage, with what each one does. Open Video Effects switches them. |
| Prompter and remote | The prompter, and buttons on a Bluetooth remote. |
| Live view | Off, Home Wi-Fi or Anywhere. |
| This Mac | Free space, power and Low Power Mode. Light mode helps a slower Mac keep up. |
| Connect a camera | A guide for an iPhone, a USB webcam or a real camera, with the cameras the Mac sees right now. |
If something goes wrong #
Screen still says "Not allowed yet"
Quit Vidlark and open it again: macOS only lets it record the screen after a restart. Check Vidlark is switched on in System Settings, Privacy & Security, Screen & System Audio Recording.
If it is on and still not allowed, the app was built without the certificate. Do the certificate step and build again. Then, in that list in System Settings, select Vidlark, remove it with the minus button, and allow it again.
"Vidlark is not allowed to use the camera yet"
Click Allow under the message. System Settings opens on the right page: switch on Vidlark. The same goes for the microphone.
The Camera row says None connected
Plug the camera in, or bring the iPhone close to the Mac. Quit other apps that may be using the camera, like FaceTime, Zoom or Photo Booth. Settings, Connect a camera has a guide for each kind of camera.
The picture says "Camera resting to save power"
Click the picture to wake it. Vidlark rests the camera and mic while it sits behind other apps, and wakes them in about a second.
The mic says "Say something to test it." and the meter stays still
Vidlark may be listening to a different mic. Click the Microphone row and pick the one you are talking into. Check the mic itself is switched on and not muted.
The camera freezes once the screen is shared
Low Power Mode is on. Plug in the charger, or switch Low Power Mode off in System Settings, Battery. The panel warns you about this before you start.
The take stopped by itself
If the camera stops sending pictures, Vidlark stops the take within a few seconds and says so, instead of filming on without a camera. Everything recorded up to then is kept. Check the camera's cable, then record again.
There is no transcript
Download the speech model, in the last install step. Then check Transcript and chapters is on in Settings, After each take.
The phone will not connect
Check the phone and the Mac are on the same Wi-Fi. Go past the warning as in the phone steps. An iPhone needs iOS 16.4 or newer, and an Android phone needs Chrome. On the Mac, the phone's row menu has Show the code again.
Terminal says "brew: command not found"
Run the two lines at the end of the Homebrew step, then try again.
Something else
Tell us on the Feedback page. A screenshot of what you see helps.
On Windows
Coming soon. Vidlark for Windows is being built now. These steps are ready for the day its download goes up on GitHub.
This is a beta. Vidlark for Windows is new and has only been tried on a few PCs so far. It records your face, your voice and your screen. Keep a copy of any take that matters, and tell us what goes wrong.
What you need #
- A PC with Windows 11, 64-bit. Settings, System, About shows it.
- A webcam and a microphone, built in or plugged in.
- Nothing else to install. No admin rights are needed.
Download and open #
Download Vidlark for Windows. It is one zip file from GitHub, with no sign-in.
Unzip it. Right-click the zip, choose Extract All, then Extract. Keep the folder together: the app and its tools sit side by side in it.
Open the Vidlark folder and double-click
Vidlark.exe.Get past the one-time warning. The first time, a blue window says "Windows protected your PC", because Vidlark is new and not signed yet. Click More info, under the message. Then click the Run anyway button that appears.
- More info
- Run anyway
The first time #
Check that apps may use the camera and the mic. If the picture or the meter stays empty, Windows may be blocking them. Open Settings (Windows I), then Privacy & security, then Camera. Switch on Camera access, and Let desktop apps access your camera.
- Settings
- Privacy & security
- Camera
- Let desktop apps access your camera
Do the same under Microphone: switch on Microphone access, and Let desktop apps access your microphone.
Your first video #
Type a title at the top, where it asks "What is this video called?". The take's folder gets that name. Without one, it is saved as Quick recording with the time.
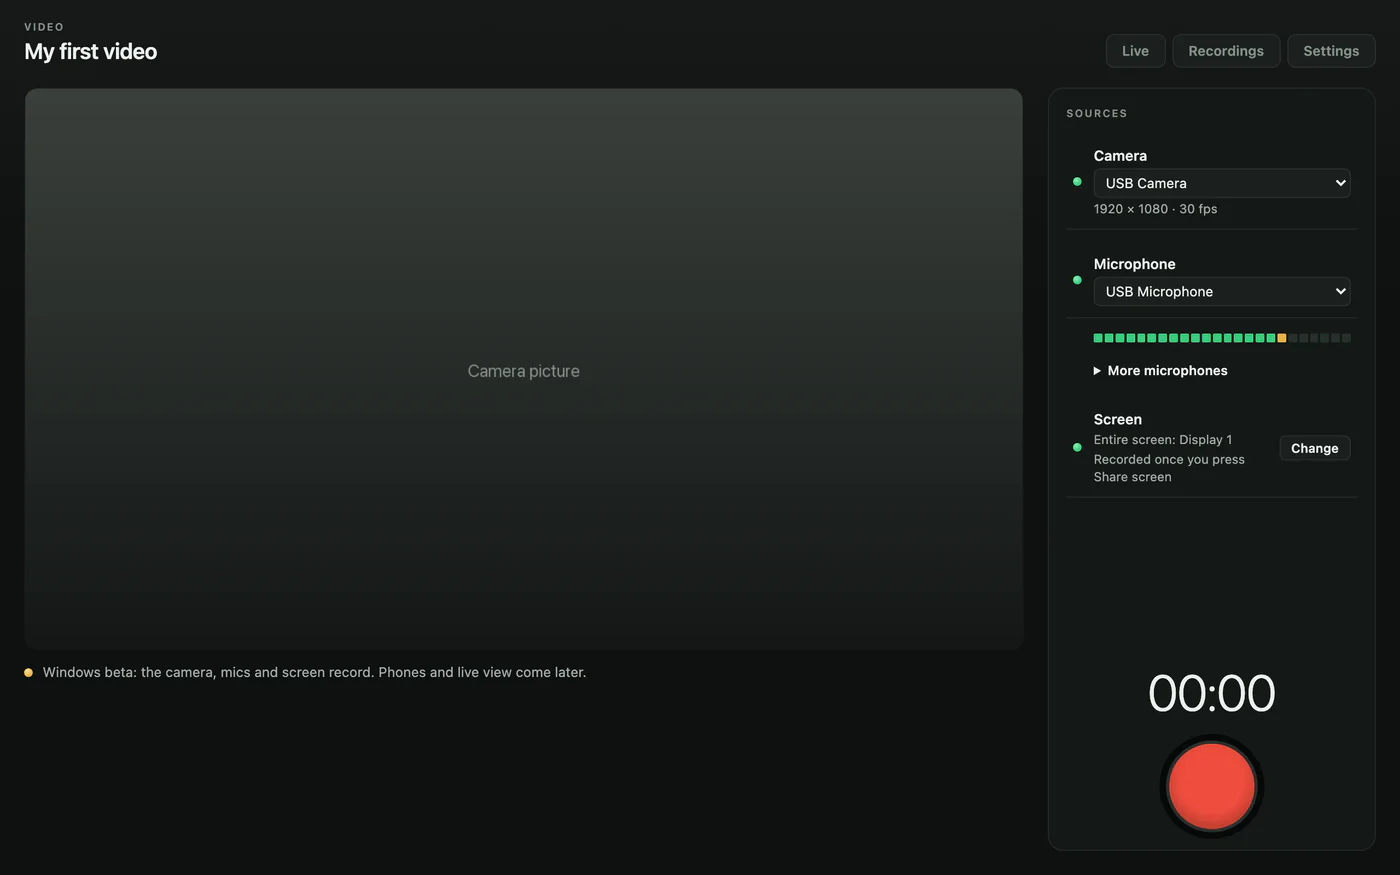
Check your camera and mic. Each has a lamp, and green means ready. Talk, and the meter moves. Pick another camera or mic from its list to change it.
To record more mics, open More microphones and tick each one. Each records to its own file. The Change button by Screen picks what Share screen will share later.
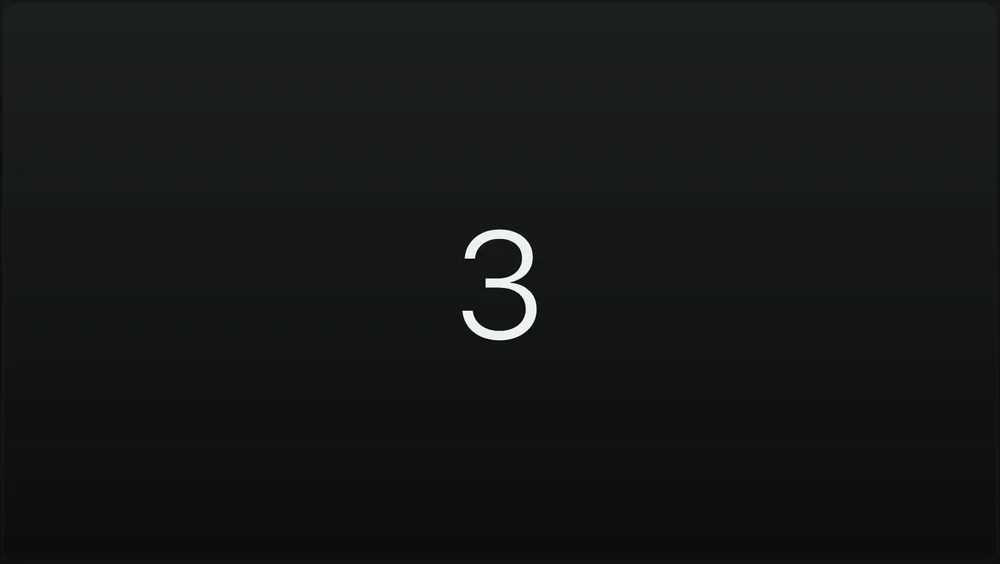
Press the red button. It counts down 3, 2, 1 with beeps. Start talking at the higher beep: that is when recording starts. Press the button again during the count to call it off.
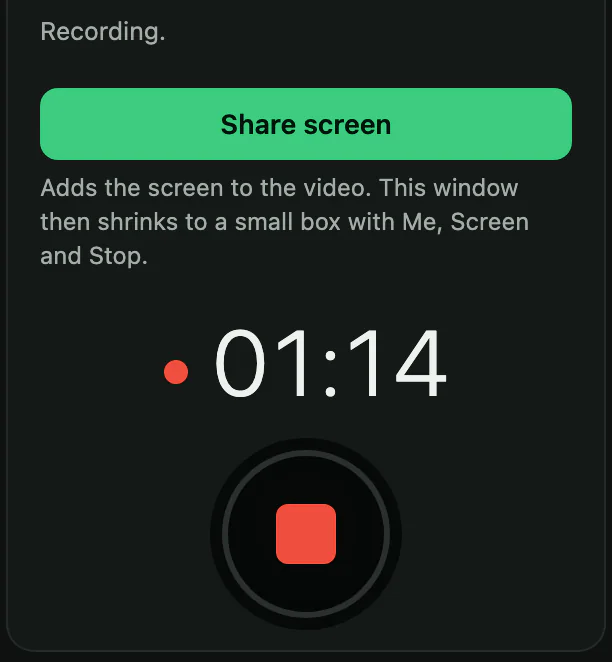
You are recording, on your face. The time counts up, and a green Share screen button appears.
For a video of just you, keep talking and press the square to stop.
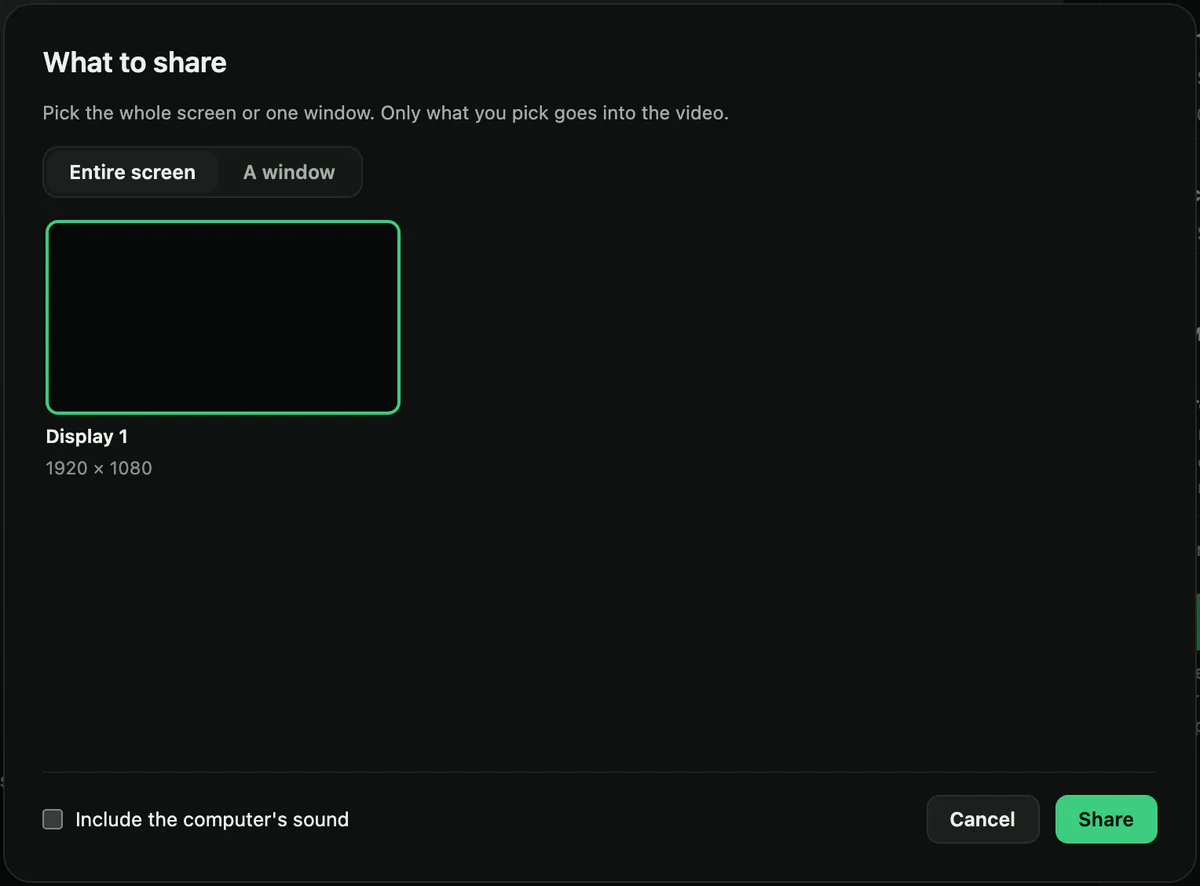
Press Share screen when you want the screen in the video. Pick Entire screen, or A window to show only one window. Tick Include the computer's sound to record what the PC plays, like a video. Then press Share.
Vidlark shrinks to a small box at the top right of the screen. The box is never in the video.
- Me puts your camera across the whole video. Screen shows the screen, with your face in a round bubble in the corner. Drag the bubble to move it.
- Face puts the bubble in the video, or takes it out.
- Sound switches the computer's sound on or off during the take.
- Vidlark brings the Vidlark window back. It never shows in the video.
- The red square stops the take.
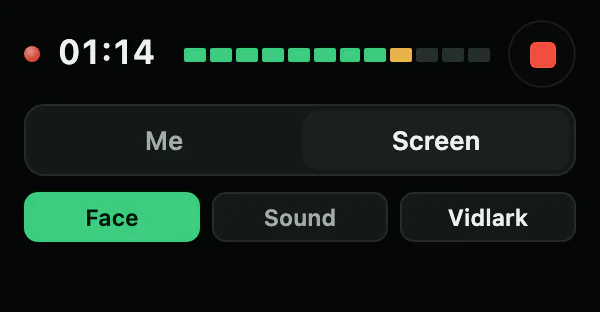
While the screen records, Windows 11 may draw a thin yellow frame around it. The frame is not in the video. Press stop. Vidlark comes back and says "Lining up and finishing the files", then "Every file is ready." This beta adds that there is no transcript yet.
Press Show the take to open the take's folder. The one to upload is
video.mp4.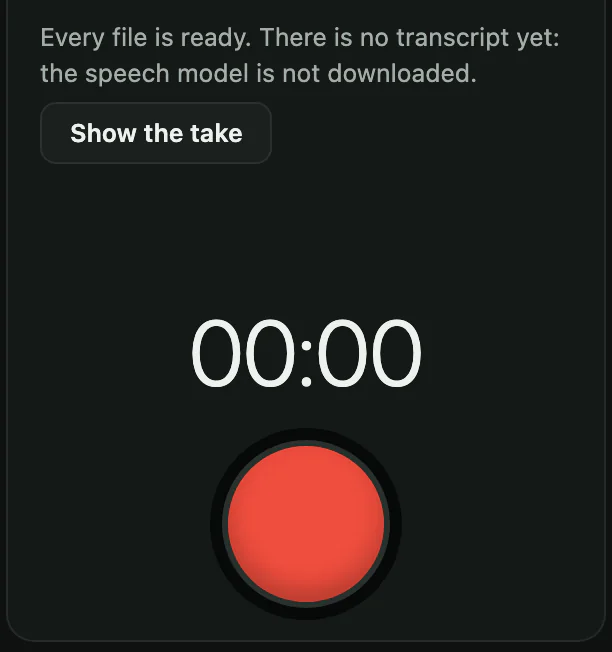
Closing the window during a take asks first: "A take is recording. Stop it and close Vidlark?"
Where your files go #
Every take gets its own folder. Show the take opens it. In File Explorer it is:
C:\Users\Public\Videos\Vidlark Recordings\<date> <title>\recording-1\| File | What it is |
|---|---|
video.mp4 | The finished video, made when you shared your screen. |
camera.mov | Your camera, with your voice. |
screen.mov | Your screen, with your voice and the computer's sound if it was on. |
mic-2.m4a | Each extra microphone. |
report.md | A plain summary of the take. |
Not in the beta yet #
The Mac version does more. These parts are still to come on Windows:
- The transcript, and the retakes list that comes from it. The beta does not download the speech model yet, so takes finish without one.
- Phones as cameras or microphones, and the live view.
- The prompter.
- Face framing: the bubble shows the middle of the camera picture.
- The Recordings and Settings pages. Their buttons are greyed out for now.
- Sound from one app only. It is all of the computer's sound, or none.
- A signed app, so Windows still shows its warning the first time.
If something goes wrong #
"The camera stopped." or the picture stays empty
Check the camera is plugged in, and that apps may use it, as in the first time. Vidlark tries the camera again when it is plugged back in, or when you come back to its window.
"No camera found."
Plug in a webcam. A camera plugged in after Vidlark opens shows up in the list by itself.
The meter does not move
Pick the mic you are talking into from the Microphone list, and check the Microphone privacy settings.
The take could not be finished
Vidlark says so instead of closing, and the take's files are kept. Send us the message word for word on the Feedback page.
Change it with Claude
Vidlark is open source under the MIT licence. If you do not like a feature, or want one it does not have, Claude Code can change your copy for you, in plain words.
Get Claude Code. It is Anthropic's coding assistant, in the Claude desktop app or in a terminal, on a Mac or on Windows. It needs a paid Claude plan.
Have your own copy of the code. If you installed Vidlark on a Mac, you already do: it is the vidlark folder in your home folder. If not, download it, or ask Claude to.
git clone https://github.com/neel542/vidlark.gitOpen the folder in Claude Code and say what you want. For example:
- "Make the countdown 5 seconds instead of 3."
- "Save my takes in my Movies folder."
- "Add a button that pauses the take."
- "Make the app purple instead of green."
Claude makes the change, builds Vidlark and runs its tests. The CLAUDE.md file in the code tells it how. It asks before installing anything, and says what it checked. Do not record while it builds: the build replaces the app.
Try your version. Not quite right? Ask again, or ask Claude to put it back. Keep it, change it or share it: the MIT licence allows all three, as long as the licence notice stays with the code.
Free, from the first take.
No account, no subscription, no watermark and no time limit.