Vidlark
How to Record Yourself and Your Screen on a Mac
Three free ways to get your face and your screen in one video on a Mac: QuickTime's floating camera, the Screenshot toolbar, or one button in Vidlark.

You can record yourself and your screen at the same time on a Mac for free. The quickest built-in way is to float QuickTime's camera window over your screen and make a screen recording, which bakes your face into the picture. If you want your face and screen as separate files, the Mac's own sound, and a finished video with no editing, a free recorder like Vidlark does it with one button.
This guide walks through all three, with the trade-offs of each, so you can pick the one that fits the video you are making.
Three ways to do it, from free and fiddly to one button
| QuickTime float | Screenshot toolbar plus camera window | Vidlark | |
|---|---|---|---|
| Cost | Free, built in | Free, built in | Free, open source |
| Setup | None | None | One-time build with Xcode |
| Face movable after recording | No | No | Yes, separate files |
| Switch to your face full screen mid-take | No | No | Yes, Me and Screen |
| Records the Mac's sound | Only on macOS 27 or later | Only on macOS 27 or later | Yes, from every app or one app |
| Macs | Any recent Mac | Any recent Mac | Apple silicon, macOS 15 or later |
If you only need a two minute clip for a colleague, the built-in tools are fine. If you are making YouTube videos, lessons or demos every week, the extra control is worth the one-time setup.
Method 1: QuickTime's floating camera window
QuickTime Player can show your camera in a window and keep that window above everything else. You then record the screen, and the camera window is captured along with it.
- Open QuickTime Player from your Applications folder.
- Choose File, then New Movie Recording. A window with your camera picture appears. You do not need to press its record button.
- Choose View, then Float on Top, so the camera window stays above your other windows.
- Make the window small by dragging a corner, then drag it to a corner of the screen where it will not cover anything important.
- Choose File, then New Screen Recording. The Screenshot toolbar appears at the bottom of the screen.
- Click Options and pick your microphone. Without this, the recording has no voice.
- Pick Record Entire Screen, then click Record.
- To stop, click the stop button in the menu bar.
What you get: one movie file with your face sitting where you left the window. That is the catch. The camera window is part of the screen picture now. You cannot move it, resize it, swap it to full screen or take it out later. If it covered a menu you clicked, that menu is hidden for good.
Method 2: The Screenshot toolbar plus a camera window
Press Command-Shift-5 and you get the same Screenshot toolbar without going through QuickTime. It is the same recorder, but a few of its options are worth knowing.
- Open your camera window first (QuickTime's New Movie Recording, set to Float on Top, as above).
- Press Command-Shift-5.
- Click Options. Pick your Microphone, a Timer (5 seconds gives you time to settle), and where to Save to. Turn on Show Mouse Clicks if you are teaching someone where to click.
- Choose Record Entire Screen or Record Selected Portion.
- Click Record, and stop from the menu bar when you are done.
One useful trick: with Record Selected Portion, you can drag the camera window just outside the area you record. You still see yourself while you talk, which helps you look natural, but your face stays out of the video.
The limits are the same as Method 1: your face is fixed in place. On macOS 27 or later, the same Options menu also has Include System Audio, which adds everything the Mac plays. On macOS 15 and 26 there is no such option.
Method 3: Vidlark, camera and screen in one take
Vidlark is a free, open source recorder for videos. One red button records your camera and mic, you share your screen when you are ready, and when you stop it hands you a finished video.mp4. It also keeps your camera and your screen as their own files, lined up by sound, in case you want to edit. Open source Loom alternatives, compared honestly compares it with Cap, Screenity and OBS Studio.
Before you start: what Vidlark needs on a Mac
- A Mac with Apple silicon (M1 or newer) on macOS 15 or later.
- There is no download button yet. You build Vidlark once on your own Mac from its code, using Xcode, which is free. The install guide walks through it, and an AI coding assistant can do most of it for you.
- A free Apple Development certificate, which macOS needs before any app built this way may record the screen. It takes a few minutes and does not need a paid developer account: see the certificate steps.
The first time
macOS asks for the camera and the microphone when Vidlark opens: click Allow. A note under the Sources list asks for screen recording. Click Allow, switch on Vidlark in System Settings, under Privacy & Security, Screen & System Audio Recording, then quit Vidlark and open it again. Every lamp in the Sources list turns green.
Record yourself and your screen
- Check the Sources list. Camera, Microphone and Screen each have a lamp. Green means ready. Say a few words and the mic meter moves.
- Press the red button. Vidlark counts down 3, 2, 1 with beeps. Start talking at the higher beep. The count is not recorded, and pressing the button again during it cancels the take.
- You are recording, on your face. Every take starts on your camera. Talk to the camera for your intro if you like.
- Press Share screen when you want the screen in the video. A window called What to share opens.
- Pick Entire screen or A window, then Share. If you pick one window, only that window goes into the video, even if something else covers it.
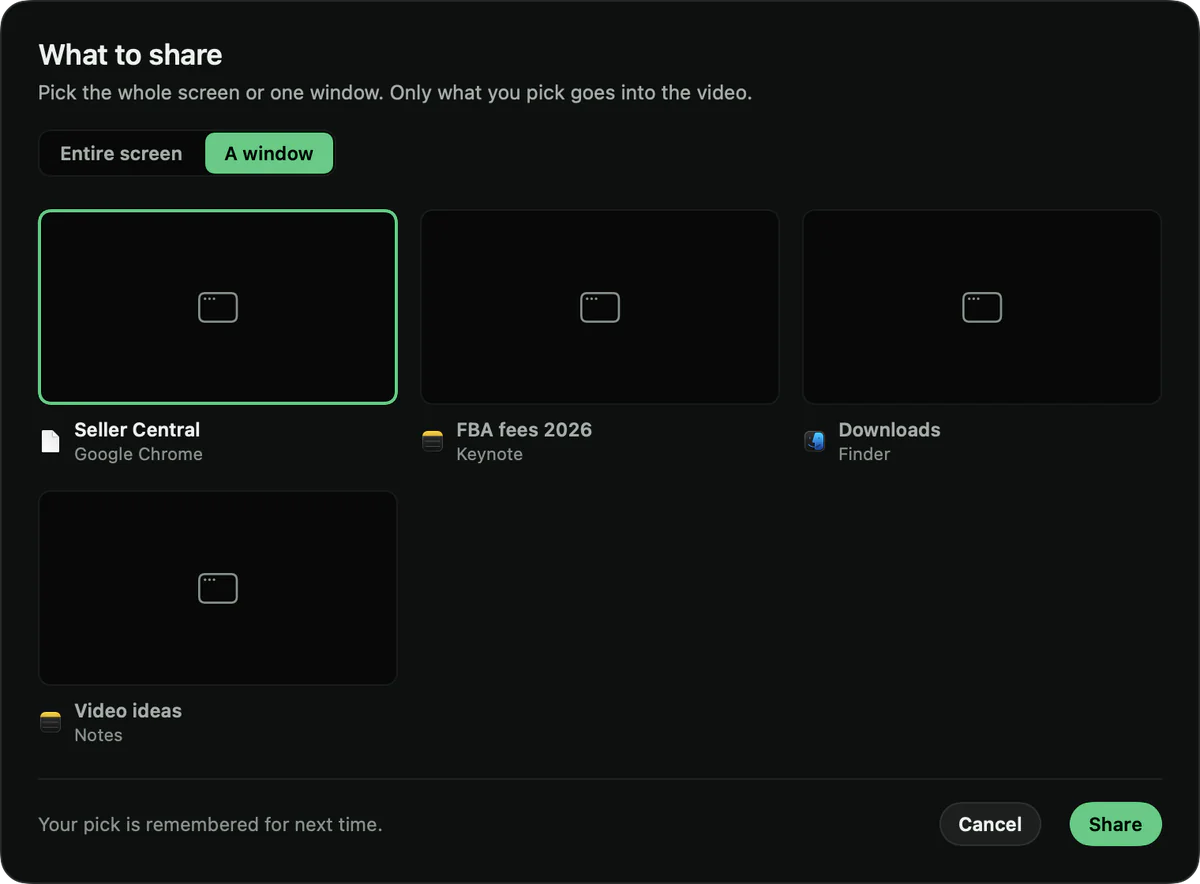
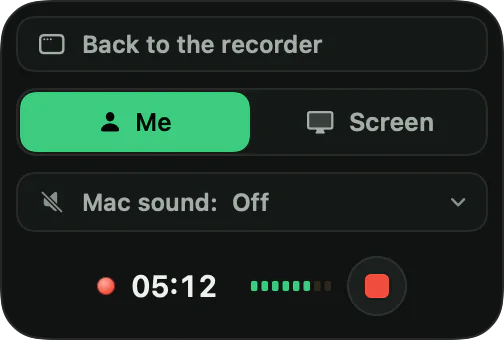
- The window shrinks to a small recording box in the top corner. The box is only on your screen, never in the video. Your camera fills the video for a moment, then it changes to your screen.
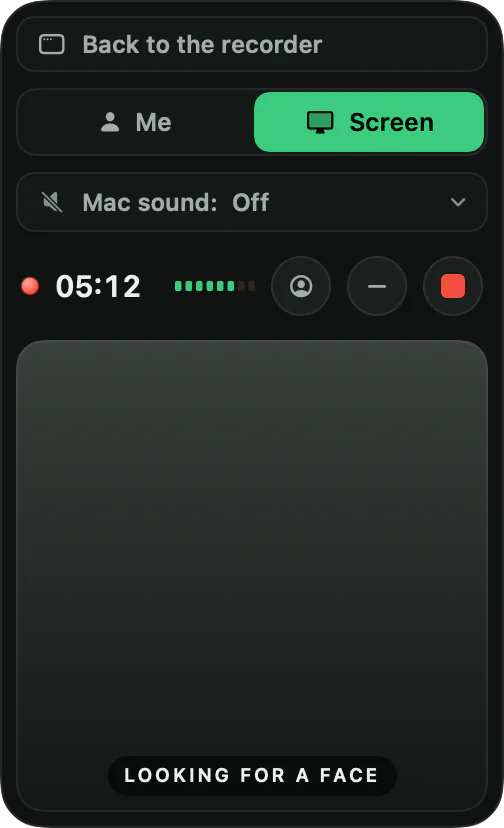
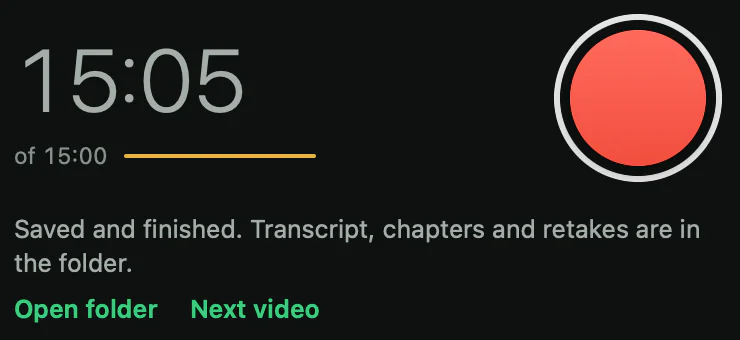
- Press the red square to stop. Vidlark lines up the files by sound, makes the finished video and writes a transcript. After a long take this takes a minute or two.
- Click Open folder. The file to upload is
video.mp4.
What lands in the folder
Every take gets its own folder in /Users/Shared/Vidlark Recordings. The three files that matter here:
video.mp4: the finished video, which follows your clicks.camera.mov: your camera with your voice, for the whole take.screen.mov: your screen from the moment you shared it, with your voice.
This is the big difference from QuickTime. If you decide in editing that your face should be bigger, on the other side, or gone, you still have the camera file. Both files carry your voice, so an editor that lines clips up by their sound, such as the free DaVinci Resolve, can match them, and sync.json in the folder holds the exact offset Vidlark measured. The file list explains the rest of the folder.
Switching between your face and your screen mid-take
In the recording box, Me grows your camera to fill the video, and Screen shrinks it away and shows the screen again. Click them as often as you like. The finished video follows the clicks, so there is nothing to cut afterwards.
When the video shows your camera full size, Vidlark keeps your face framed, like a camera operator: still while you talk, a smooth glide when you move. You can turn that off in Settings, In the video. A sharper camera helps here too: an iPhone makes a big difference over a laptop webcam, and using your iPhone as a webcam shows two ways to connect one.
Want your face in a corner while the screen shows? Open Settings, In the video, and under Your face on the screen pick Circle, Square, Oval or Wide. During a take, the face button in the box puts your face in or takes it out, and you can drag it anywhere. The camera file is always saved too, so the shape can still change when you edit.
Getting the Mac's sound in too
Until this year, neither QuickTime nor the Screenshot toolbar recorded the sound your Mac plays, such as a video, a game or an app's alert. Apple's screen recording page now says that on macOS 27 or later you can choose Include System Audio in the toolbar's Options. That is all or nothing: every app's sound, pings included, mixed in for the whole recording.
On macOS 15 and 26 the old fix was a virtual audio driver like BlackHole. You no longer need one there either, because apps that record the screen can capture the Mac's sound directly.
In Vidlark, the Mac sound button in the recording box has three choices:
- Off: only your microphone.
- Every app: everything the Mac plays.
- Only one app: for example only Chrome, so a video you are reacting to is recorded but your message pings are not.
You can change it at any moment of the take, and your mic is always recorded either way. The Mac's sound goes into the video as a second sound track, and Notification Center's pop-ups are kept out of the picture. To have it on from the start, switch on Include the Mac's sound in Settings, In the video.
Fixing the common problems
Vidlark: sharing the screen is refused, even though it is switched on in System Settings. Vidlark was built without the free certificate. macOS 15 and later refuse screen recording to apps signed without one, even with the switch on. Do the certificate steps, build again, then in System Settings remove Vidlark from the Screen & System Audio Recording list with the minus button and allow it again.
Vidlark: the camera froze once the screen was shared. Low Power Mode is probably on. Plug in the charger or turn it off in System Settings, Battery. Vidlark warns about this under the Sources list before you start.
The picture says "Camera resting to save power." Click it. Vidlark rests the camera while it sits unused behind other apps, and wakes it in about a second.
QuickTime: my recording has no voice. The microphone is picked in the toolbar's Options menu, and it is easy to miss. Pick your mic before you press Record.
QuickTime: the camera window covered what I was clicking. There is no fix after the fact. Next time, record a selected portion and keep the camera window outside it, or use a recorder that keeps the camera as its own file.
No camera shows up at all. Quit FaceTime, Zoom and Photo Booth, which can hold on to the camera. Then check System Settings, Privacy & Security, Camera.
What to do next
For a quick clip, QuickTime is already on your Mac. For videos you will publish, try Vidlark free: the step-by-step guide shows every screen, and the code is on GitHub.
Making YouTube videos? How to record a YouTube video on a Mac takes this further, with a script, a prompter and chapters. On a Windows 11 PC instead, the Windows beta steps work the same way, with fewer buttons. And if you want to compare every free option first, start with free Mac screen recorders with no watermark. Leaving Loom? Free Loom Alternatives With No Limit, No Catch covers the options, and How to record online course videos at home is for lessons.
Questions
Can QuickTime record my screen and webcam at the same time?
Not as two recordings. The usual trick is to open a camera window with New Movie Recording, set it to float on top, then make a screen recording. Your face becomes part of the screen picture and cannot be moved or removed later.
Why is there no computer sound in my QuickTime screen recording?
Before macOS 27, the Screenshot toolbar and QuickTime record your microphone only. On macOS 27 or later, Options has Include System Audio. On older versions, or to record one app only, use an app such as Vidlark, OBS or Cap.
Is Vidlark free?
Yes. It is free and open source under the MIT licence, with no account, no watermark and no time limit. On a Mac you build it once from its code with Xcode, which is also free.
Can I move my face bubble after recording?
With QuickTime, no. With Vidlark, the camera and the screen are saved as separate files as well as the finished video, so you can place your face anywhere, or leave it out, when you edit.